|
|
|
To start:
The first thing you must do is to decide who you are going to interview. When you have decided that, you need to be very clear about what sort of things you will ask them in your interview. And don't forget to ask them whether you can interview them, and when!
You can print out these instructions if you like, and the two pages will also have a plan for you to set up how you will do all the jobs. Click here for the pdf to print out.
You need to organise a folder, so you can put everything inside. Call your folder Interview. Inside it, make another folder called images - that is where you will keep all your photos, your paintings or the images you find on the intranet or internet. When you write up your questions and answers, you will save them in the interview folder.
You need to write a paragraph about the person you are interviewing, so we know who they are, and a little bit about them. Save this in your folder.
There are 4 pages to write up your questions, so it is a good idea to stick to four questions. You could elaborate (ask more questions about the same thing) if you need to know more about a particular topic.
Make sure your questions are fat questions, not skinny ones. You want the person to talk for quite a bit about their answer, not give a quick one or two word answer!
Write your questions down, and check with other people that they are good questions.
You will need to have a photo of the person for the front page of your website, and another one for the introduction page, so we know who you are interviewing. Use one of the digital cameras, and take several photos of your person. Be careful to look at what is in the background!
You will also need one photo (or perhaps a picture from the internet or intranet, or perhaps one you have drawn yourself in ArtRage) for each of the question pages. The photo, drawing, or internet image must be something to do with the topic on that page, remember.
If you want to, you could take a photo of all the people in your group, and put it on the Thanks and Credits page!
You need to name your photos with the question, so Miss Currie will know where you want to put them. So your photos might be called question1.jpg, or quest2.jpg, and maybe group.jpg.
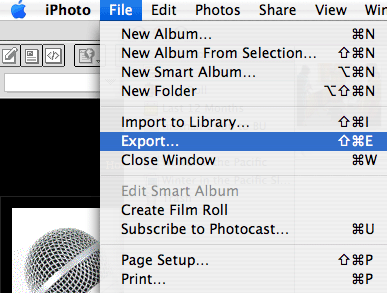
Download the photos to iPhoto on your class computer, and choose the best ones. Then go File - Export,

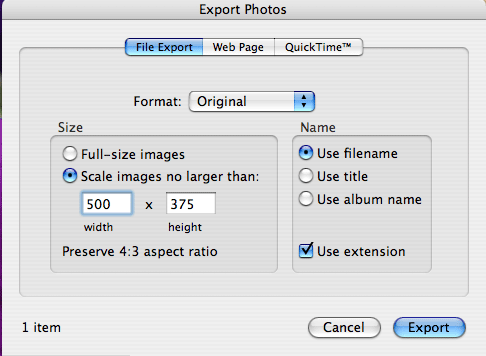
and change the size to 500 pixels across (if the photo is landscape layout) or 500 pixels high (if the photo is portrait layout). Save the photo in your interview folder, under images.

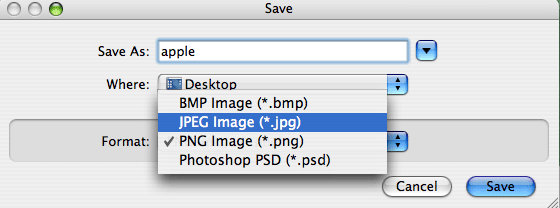
If you are drawing something in ArtRage, then when you have finished, you need to Export it by going File - Export as Image.

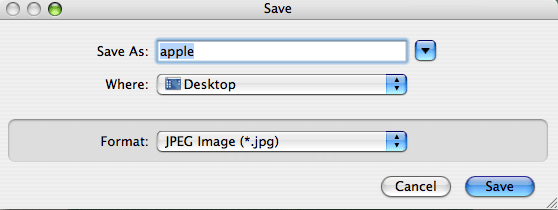
Then you must make sure it is saved as a JPEG image, not as a PNG.

Your window should look like this before you click Save.

Now make sure it is saved inside your images folder.
If you took the photo, or drew the picture, you don't need to worry about copyright. But if you took someone else's image (from the internet or intranet) you must say where you got it from. If you don't do that, you are pretending that it is yours, and it isn't!
You need to say where you got it from, and write that on your sheet that has the questions on it.
When you are ready, you need to sit down and do the interview. One person should be asking the questions and listening carefully to the answers, so that they could ask clarifying questions if something in the answer isn't clear.
Other people in the group should be taking notes, or recording the answers, not the person asking the questions.
Don't forget to LISTEN to the person and what they are saying!
As soon as possible, you need to write up your answers. Write the first question, and then the answer below it. Because people will be reading it, it needs to be in whole sentences.
At the end of the page, write down what you want to say on the Thanks and Credits page. You need to give the names of everyone who worked on this project, and what they did. Don't forget to say who took the photos, drew the pictures, and did the typing.
When you have written out everything, save your document in your interview folder. It would be a good idea to write out the questions and save them beforehand, and then you can just add the answers in later.
MAKE SURE you have checked the sense and punctuation and spelling - you don't want everyone seeing mistakes on your site!
Getting it published on the intranet:
Check through your folder to make sure that everything is there. Then you can go and see Miss Currie, and she will put your work together as a website, and put it on the intranet for everyone to see.
Brilliant! Now you will be world-famous at Puhinui, and everyone will enjoy reading your work.