Go Back
Basics
|| Changing
appearance || New
boxes || Rapidfire
|| Arranging
|| Notes
|| Hyperlinks
|| Spellchecking
|| Extras
|| Printing
Advanced
Inspiration
Basics:
- Always select before making any changes to appearance (click
on it)
- Holding your mouse over a button will (after a second or two)
show a description of what it does
- There are two ways to view Inspiration pages: Diagram
is the usual way, and Outline gives the information as a
structured outline. Click on the top left button (saying either
Outline or Diagram) to flip from one to the
other
- When you save a page, it will name itself after the first box
you enter (ie the main idea), but you can change it if you wish
Back to Top
Changing
the appearance:
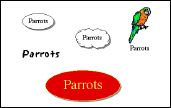
See if you can make boxes that look like these examples
above
|
|
- First click on the main idea
- Change font by either using the menu bar (Text -
Font, Size, Style, Justify,
Color) or using the bottom of the window list of fonts,
sizes, styles and colour.

- Change the colour of the box or circle containing the writing
by clicking the first three ovals along the bottom of the screen
past the underlined A.
- The first one reverts to the original style
- The second one colours the inside of the box or circle
- The third one colours the outside.
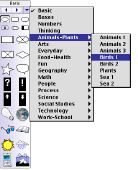
- Change the box or image by clicking on the part you want to
change, and then selecting a new image from the symbol palette
down the left of the window. The small arrows at the top flip
between different palettes, and the righthand down arrow brings up
the library of symbols you can choose from.
Back to Top
Adding
new boxes:
- To make a new stand-alone box, just click on the page where
you want it, and click the shape you want from the symbol
palette.

- To make a new box linked to the main idea, use the
Create button (click on the part that makes a link in the
direction you want.
- To link two boxes, click the Link button, then on the
first box to link from, and then the second box to link to.
- You can click halfway along the link arrow and write in the
box that shows to explain the nature of the link if you wish.

- Delete links by clicking on them and pressing Delete on
the keyboard.
Back to Top
Using
the RapidFire:
- To do a brainstorm, you may wish to make all your boxes
unlinked, and move them around and link them at a later stage.
- To make a fast lot of links from one central box, click on
that box, and then press the RapidFire button.
- Type the first word or phrase, and then press
Return.
- Now type the next word or phrase.
- Each time you press Return, it will make a new linked
box.
Back to Top
Tidying
up your boxes:
|
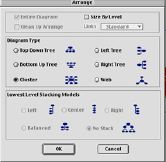
- Click on the Arrange button and select a
suitable form for your web.
- It is best to do this right at the end of making your
diagram.
- If you do not like the results, go Edit -
Undo to revert to your original layout.
|
|
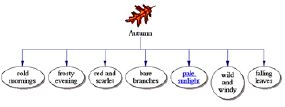
- At the top of the Arrange window, clicking on
Auto-90 instead of Standard gives you squared off
links like those shown below.
Back to Top
Making
notes:
- You can add full notes to any of your boxes.
- Double click on the top left handle of a box, and it
opens the note field, which you can type in.
- Close the notes by clicking the close box.
|

|
- From now on, when you click on that particular box, a note
icon will appear at the top right corner. Clicking on it will make
the notes appear.
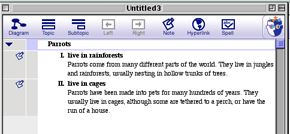
- If you click on Outline, you will see (and can print
out) all the notes in full, organised into a detailed outline.
- Clicking the arrow just under the Diagram button will
show or hide the different subtopics below.
Back to Top
Hyperlinks:
- You can link words in Inspiration in the same way as you link
them in a web page, with hyperlinks.
- Select the wording you want to link, click on the
Hyperlink button, and then tell Inspiration where you want
it to link to.
- You can link to another Inspiration document, or to an
AppleWorks document.
- When the words are linked, they will be blue, and
underlined.
- Click on them, and you will jump to the selected file.
- Links work in both Outline and Diagram view.
Spellchecking:
- You can spellcheck by simply clicking the Spell
button.
- It works in both Outline and Diagram view, and
checks all notes whether they are showing or not.
Back to Top
Extras:
- You can draw lines or shapes using the following tool at the
bottom of the screen. Click and hold on the little down arrow and
you will be shown the following choices.

- Under Effect in the menu bar you can vary line
thicknesses and fill colours (be wary of doing coloured
backgrounds if you are printing - it is a phenomenal waste of ink,
and can make the text difficult to read in black and white).
- You can also set your choices of fill colour, font and text
size, and also the shape that new boxes automatically take.
- Make your first box, and adjust these things to the way you
want.
- Now click and hold the double T icon at the bottom of the
screen, and highlight Set Default.
- Now all new boxes will look like the first one.

Back to Top
Printing:
- You can set up Inspiration pages to print landscape or
portrait, under File - Page Setup.
- Note that the best option to select there is Fit to one
page.
- You may have problems printing out in US Letter size - if
you try and print this paper size the printer simply sits there
asking for you to load that size paper (until someone goes to
the printer and clicks the Cancel Job button.)
- To avoid this happening,
- Open the Page Setup window, and click on the
Options button.
- Select A4 as your size.
- Hold down the Option key as you click the OK
button.
- You will be asked if you want to save the current
settings as the default - click Yes.
- Now Inspiration will always assume that you want A4
sized documents.
Back to
Top


